Difference between revisions of "4x4 CNC Mill"
(Adds two images from npolansky, 23 Dec 2017.) |
m (Adds link to CNC (general) article.) |
||
| (5 intermediate revisions by the same user not shown) | |||
| Line 1: | Line 1: | ||
| + | {| class=infobox style="float:right; width:25%; padding: .5em 1em; margin: 1em; background-color: #f0f0ff; box-shadow:0px 5px 5px #666; border: 1px solid #008ac3" | ||
| + | |colspan=2 align=center style="margin:0;background-color:#008ac3;font-size:120%;font-weight:bold;border:1px solid #008ac3;text-align:center;color:#fff;padding:0.2em 0.4em;border-radius:25px;"|'''4x4 CNC Router/Mill''' | ||
| + | |- | ||
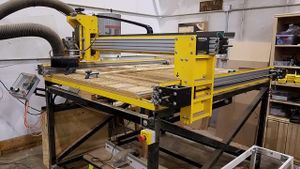
| + | |colspan=2|[[File:4x4-cnc-mill-router all-01 20171208.jpg|200px]] | ||
| + | |- | ||
| + | |colspan=2|'''Location''' | ||
| + | |- | ||
| + | |colspan=2|In the [[Wood Shop]].<br/> | ||
| + | |- | ||
| + | |colspan=2|'''Classes'''<br/>4x4 CNC Mill (as needed) | ||
| + | |} | ||
| + | |||
The '''4x4 CNC Mill''' is a CNC router/mill in the [[Wood Shop]]. The router typically cuts boards of wood or plastic. The finished part can be a 2D shape or a 2.5D/3D shape. | The '''4x4 CNC Mill''' is a CNC router/mill in the [[Wood Shop]]. The router typically cuts boards of wood or plastic. The finished part can be a 2D shape or a 2.5D/3D shape. | ||
| Line 8: | Line 20: | ||
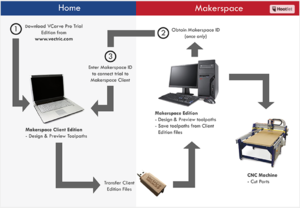
== Process Overview == | == Process Overview == | ||
[[File:CNC-Router-Basic-Workflow 20171223 npolansky.png|thumb|Basic workflow for CNC router. (Source: npolansky.)]] | [[File:CNC-Router-Basic-Workflow 20171223 npolansky.png|thumb|Basic workflow for CNC router. (Source: npolansky.)]] | ||
| − | |||
* On the computer, create a 2D or 3D geometry. | * On the computer, create a 2D or 3D geometry. | ||
| − | * On the computer, run Vcarve, pull in the geometry file, create the toolpath from the geometry, then write the G-code file. | + | * On the computer, run [[Vcarve]], pull in the geometry file, create the toolpath from the geometry, then write the G-code file. |
* On the router, set up the workpiece and install the router bit. Start the router equipment. | * On the router, set up the workpiece and install the router bit. Start the router equipment. | ||
| − | * On the computer, run the Mach4 software, pull in the G-code, set up the toolpath and machine settings. | + | * On the computer, run the [[Mach4]] software, pull in the G-code, set up the toolpath and machine settings. |
* Turn on the router spindle and dust collection. | * Turn on the router spindle and dust collection. | ||
| − | * On the computer in Mach4, run the G-code program. | + | * On the computer in [[Mach4]], run the G-code program. |
* Remove your workpiece. Remove the bit & clean the collet. Clean up the table, floor, etc. | * Remove your workpiece. Remove the bit & clean the collet. Clean up the table, floor, etc. | ||
| Line 33: | Line 44: | ||
=== Vcarve Software Usage === | === Vcarve Software Usage === | ||
| − | + | [[File:4x4-cnc-mill-router_computer-01_20171208.jpg|thumb|upright=0.40|Computer workstation.]] | |
| − | Run Vcarve on the router workstation. Generate a 2D or 2.5D/3D geometry. | + | Run [[Vcarve]] on the router workstation. Generate a 2D or 2.5D/3D geometry. Generate the G-code file(s). |
=== Router Setup === | === Router Setup === | ||
| Line 41: | Line 52: | ||
* Remove old workpieces, clamps, T-bolts, etc. from bed. Clean out T-slots in bed. | * Remove old workpieces, clamps, T-bolts, etc. from bed. Clean out T-slots in bed. | ||
* Position spoilboard & workpiece (typically by lower left corner of bed, which is the machine coordinates X-Y home). | * Position spoilboard & workpiece (typically by lower left corner of bed, which is the machine coordinates X-Y home). | ||
| − | * Attach workpiece solidly to bed. Typically will use clamps with T-bolts or use carpet tape. Keep attachments out of the path of the spindle. If unsure | + | * Attach workpiece solidly to bed. Typically will use clamps with T-bolts or use carpet tape. Keep attachments out of the path of the spindle. If unsure whether your attachment is sufficient, consult with an expert. |
==== Power up the Router Table and Electronics ==== | ==== Power up the Router Table and Electronics ==== | ||
| + | [[File:4x4-cnc-mill-router_table-01_20171208.jpg|thumb|Router table with e-stop on right and control box on left.]] | ||
* At Spindle Control Box (on front left of router table), rotate green switch to “on” (will light up). (A quiet buzz is normal.) Assure spindle motor is off (i.e., set the toggle switch at bottom right of box). | * At Spindle Control Box (on front left of router table), rotate green switch to “on” (will light up). (A quiet buzz is normal.) Assure spindle motor is off (i.e., set the toggle switch at bottom right of box). | ||
=== Mach4 Software Usage === | === Mach4 Software Usage === | ||
| − | * Start Mach4 software on the router workstation (only after the router table and its electronics are turned on). | + | * Start [[Mach4]] software on the router workstation (only after the router table and its electronics are turned on). |
* Select the “Fami4x4” profile. | * Select the “Fami4x4” profile. | ||
* Load in your G-code file (with .txt extension or .tap or .nc). | * Load in your G-code file (with .txt extension or .tap or .nc). | ||
| Line 59: | Line 71: | ||
==== Install Router Bit ==== | ==== Install Router Bit ==== | ||
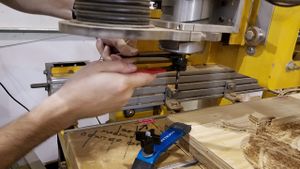
| + | [[File:4x4-cnc-mill-router_bit-removal-01_20171208.jpg |thumb|Using wrenches to tighten/loosen the collet nut.]] | ||
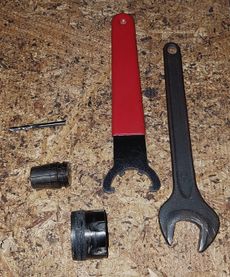
| + | [[File:4x4-cnc-mill-router_collet-&-wrenches-01_20171208.jpg |thumb|upright|Bit (tool), collet, & collet nut (left) and spanner & open-end wrenches (right).]] | ||
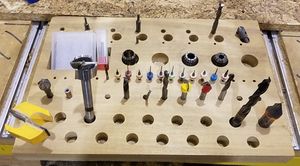
| + | [[File:4x4-cnc-mill-router_tool-tray-01_20171208.jpg |thumb|Tool tray with bits (tools) & collets.]] | ||
* Remove dust shoe on spindle mount. (Held on by magnets.) | * Remove dust shoe on spindle mount. (Held on by magnets.) | ||
* Loosen collet nut on spindle shaft by using the two wrenches (open-end on spindle, spanner on nut). Remove old bit, clean it, & put it into tool tray. Remove collet nut & collet. Knock collet out of nut (gently but firmly). Put collet in tool tray. | * Loosen collet nut on spindle shaft by using the two wrenches (open-end on spindle, spanner on nut). Remove old bit, clean it, & put it into tool tray. Remove collet nut & collet. Knock collet out of nut (gently but firmly). Put collet in tool tray. | ||
| Line 69: | Line 84: | ||
==== Run Test Cut ==== | ==== Run Test Cut ==== | ||
| − | * Jog Z to raise the spindle up to 1.000” Z on DRO (or more if needed to clear workpiece). Record the Z-axis workpiece coordinate shown in DRO. In Mach4, zero the Z-axis workpiece coordinate. | + | * Jog Z to raise the spindle up to 1.000” Z on DRO (or more if needed to clear workpiece). Record the Z-axis workpiece coordinate shown in DRO. In [[Mach4]], zero the Z-axis workpiece coordinate. |
* In Mach4, press “Cycle Start” button. Be prepared to press “Feed Hold” button or “Stop” button. Watch toolpath on workpiece for unexpected motion or for hitting clamps, etc. | * In Mach4, press “Cycle Start” button. Be prepared to press “Feed Hold” button or “Stop” button. Watch toolpath on workpiece for unexpected motion or for hitting clamps, etc. | ||
* When done running test cuts, jog Z to lower the spindle to -1.000” Z on DRO (or, if other value was recorded, to the negative of that value). In Mach 4, zero the Z-axis workpiece coordinate. | * When done running test cuts, jog Z to lower the spindle to -1.000” Z on DRO (or, if other value was recorded, to the negative of that value). In Mach 4, zero the Z-axis workpiece coordinate. | ||
| Line 79: | Line 94: | ||
* Turn crank (on top of filter) a few times. Check collection bag & replace if full. Turn on dust collection motor using switch on back (by the wall). | * Turn crank (on top of filter) a few times. Check collection bag & replace if full. Turn on dust collection motor using switch on back (by the wall). | ||
* Jog Z to raise spindle about 1” (25mm). Put dust shoe onto spindle head (only when spindle motor is off). | * Jog Z to raise spindle about 1” (25mm). Put dust shoe onto spindle head (only when spindle motor is off). | ||
| − | [[File:Feeds-&-Speeds-for-Router_npolansky_20171223.png|thumb| | + | [[File:Feeds-&-Speeds-for-Router_npolansky_20171223.png|thumb|[[Router (general)#Speeds & Feeds|Table of speeds & feeds:]] recommended speeds, feeds, and depth of cut for common router bits and materials. (Source: npolansky.)]] |
==== Turn on Spindle ==== | ==== Turn on Spindle ==== | ||
| Line 87: | Line 102: | ||
==== Run the Cut ==== | ==== Run the Cut ==== | ||
* Verify that speed overrides & other settings are correct for cutting. Stop, think, & verify that you are ready to cut. | * Verify that speed overrides & other settings are correct for cutting. Stop, think, & verify that you are ready to cut. | ||
| − | * In Mach4, press “Cycle Start” button. Be prepared to press “Feed Hold” button or “Stop” button. Watch toolpath on the workpiece for unexpected motion or for hitting clamps, etc. | + | * In [[Mach4]], press “Cycle Start” button. Be prepared to press “Feed Hold” button or “Stop” button. Watch toolpath on the workpiece for unexpected motion or for hitting clamps, etc. |
* Adjust spindle motor speed as needed. | * Adjust spindle motor speed as needed. | ||
| Line 96: | Line 111: | ||
* [https://docs.google.com/document/d/1ZEGa1Sd0sPQaTdG6QrA-GZljdWFA1Em6YIAwVfKedIY/pub Darkmoonsinger's excellent writeup] (but somewhat dated now). | * [https://docs.google.com/document/d/1ZEGa1Sd0sPQaTdG6QrA-GZljdWFA1Em6YIAwVfKedIY/pub Darkmoonsinger's excellent writeup] (but somewhat dated now). | ||
* Additional notes in this [https://forums.familab.org/lab-tools/cnc-router-tutorial/msg9056/#msg9056 forum thread]. | * Additional notes in this [https://forums.familab.org/lab-tools/cnc-router-tutorial/msg9056/#msg9056 forum thread]. | ||
| − | * [https://familab.slack.com/messages/C098JPAH3/details/ "CNC 101" class presentation]. NPolansky created in Jul 2016. Covers 4x4 CNC Mill, [[HAAS VF-1 CNC Mill|Haas VF-1 CNC Mill]], Vcarve software, Fusion 360 software, CNC operation, etc. | + | * [https://familab.slack.com/messages/C098JPAH3/details/ "CNC 101" class presentation]. NPolansky created in Jul 2016. Covers 4x4 CNC Mill, [[HAAS VF-1 CNC Mill|Haas VF-1 CNC Mill]], [[Vcarve]] software, [[Fusion 360]] software, CNC operation, etc. |
=== Experts === | === Experts === | ||
| − | * CNC Experts: | + | * CNC Experts: [[User:Npolanosky|npolanosky]]; [[User:Chorca|chorca]]; [[User:Circuit|circuit]].<br> |
| − | * G-code Experts: | + | * G-code Experts: [[User:Netadmindave|netadmindave]].<br> |
=== Internal Links === | === Internal Links === | ||
* [[4x4 CNC Router Upgrades]]. | * [[4x4 CNC Router Upgrades]]. | ||
| + | * [[Router (general)]]. | ||
| + | * [[Router/Router Table]]. | ||
| + | * [[Vcarve]] software. | ||
| + | * [[Mach4]] software. | ||
| + | * [[CNC (general)]]. | ||
=== External Links === | === External Links === | ||
Latest revision as of 04:06, 28 January 2018
| 4x4 CNC Router/Mill | |
| |
| Location | |
| In the Wood Shop. | |
| Classes 4x4 CNC Mill (as needed) |
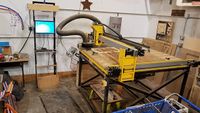
The 4x4 CNC Mill is a CNC router/mill in the Wood Shop. The router typically cuts boards of wood or plastic. The finished part can be a 2D shape or a 2.5D/3D shape.
The 4x4 CNC router/mill has a 4' x 4' (1.2 x 1.2 m) cutting area and about 5" (130mm) vertical range. FamiLAB members built it based on Joe’s 4x4 Hybrid CNC Router with considerable customization. The router motor can be run at 5,000 to 25,000 RPM. The router has collets for 1/8", 1/4", 3/8", and 1/2" shank tooling. The router bed has HFS8 hold-down slotting for use with T-bolts. The tool speed is up to 300 in/min (125 mm/s).
The router's computer workstation has Mach4 CAM/CNC software to operate the router. It also has Vcarve software, which is typically used to create the geometry and the G-code program.
Contents
Process Overview
- On the computer, create a 2D or 3D geometry.
- On the computer, run Vcarve, pull in the geometry file, create the toolpath from the geometry, then write the G-code file.
- On the router, set up the workpiece and install the router bit. Start the router equipment.
- On the computer, run the Mach4 software, pull in the G-code, set up the toolpath and machine settings.
- Turn on the router spindle and dust collection.
- On the computer in Mach4, run the G-code program.
- Remove your workpiece. Remove the bit & clean the collet. Clean up the table, floor, etc.
Rules
The CNC is expensive and FamiLAB members have put a lot of work into it. We need to keep the machine running in the best condition so everyone can enjoy it. These rules are strict for a reason - to encourage careful, responsible usage of a large piece of equipment.
- Do not run the machine unattended. The machine has the capability to quickly destroy itself, bits, clamps, drive systems, etc. Stay near the machine at all times it is running a program and be ready to E-stop if an issue arises
- If something is broken, TELL SOMEONE. If you broke it, if someone else broke it, if you SAW someone else break it, make it known in the #woodshop-cnc channel on Slack. Breaking it and leaving it without telling anyone will result in you not being able to use the machine anymore.
- If you ruin something, replace it. If you damage a clamp, if you ruin the spoilboard, if you break a lab bit, if you damage a collet, you are expected to fix or replace it. If you are not able to do so, ask other members in the #woodshop-cnc channel for options. We keep some spares on hand but these are not consumable items. If items keep becoming damaged, they will no longer be available and you will have to provide your own.
- If you do not know 100% how to do something, ASK. If you are not sure how to set up a job, how to run the machine, etc. then ASK. If you negligently damage the machine, it is expected that you assist with repairs (financially or otherwise).
- If something does not look right, STOP. Be ready to halt the machine if something does not sound right, smoke appears, bad noises are heard, movement is not correct, etc. Run a simulation on every cut. Keep feed rates very slow when starting a new (unproven) program to make sure you have time to hit a stop button if something goes awry.
- CLEAN UP AFTER YOURSELF. The CNC is not to be run without the dust collector on and the dust shoe in place. If for some reason you need to run a test cut without dust collection, you are required to vacuum the entire machine afterward. Cleaning up includes removing dust from your cuttings and the table. Do not leave the table a mess. A flexible hose connected to the dust collector is available. USE IT. Do not leave cuttings and swarf on the table or leaning against anything. The CNC is not a storage bin.
- Put all tools back when you are done. Keep all bits in their holders as they are very sharp and dangerous. Put all tools back in their proper place. Remove collets and put them back in storage.
Usage of the CNC Router
Vcarve Software Usage
Run Vcarve on the router workstation. Generate a 2D or 2.5D/3D geometry. Generate the G-code file(s).
Router Setup
Mount Workpiece
- Remove old workpieces, clamps, T-bolts, etc. from bed. Clean out T-slots in bed.
- Position spoilboard & workpiece (typically by lower left corner of bed, which is the machine coordinates X-Y home).
- Attach workpiece solidly to bed. Typically will use clamps with T-bolts or use carpet tape. Keep attachments out of the path of the spindle. If unsure whether your attachment is sufficient, consult with an expert.
Power up the Router Table and Electronics
- At Spindle Control Box (on front left of router table), rotate green switch to “on” (will light up). (A quiet buzz is normal.) Assure spindle motor is off (i.e., set the toggle switch at bottom right of box).
Mach4 Software Usage
- Start Mach4 software on the router workstation (only after the router table and its electronics are turned on).
- Select the “Fami4x4” profile.
- Load in your G-code file (with .txt extension or .tap or .nc).
- Set up the machine coordinate system & extents, if needed.
Router Cutting
Emergency Stop
- Emergency stop buttons are red and are located on the front right and on the back of the router table. Emergency stop button immediately stops the X & Y motion and the G-code execution. Emergency stop buttons DO NOT stop the spindle or the Z motion.
Install Router Bit
- Remove dust shoe on spindle mount. (Held on by magnets.)
- Loosen collet nut on spindle shaft by using the two wrenches (open-end on spindle, spanner on nut). Remove old bit, clean it, & put it into tool tray. Remove collet nut & collet. Knock collet out of nut (gently but firmly). Put collet in tool tray.
- Select proper collet for new bit; use only the router collets (which are proprietary & not ES16 collets). Inspect & clean collet. Pop collet into collet nut (gently but firmly). Thread collet nut onto spindle shaft. Slide tool bit into collet (typically as far as possible without grabbing flutes). Tighten collet nut onto spindle shaft by using the two wrenches.
Set Workpiece Offset (set the workpiece coordinate system's origin)
- Choose a location on the workpiece for the X-Y origin of the workpiece coordinate system (typically G54). (Be sure the toolpath will not hit the clamps when using this origin.)
- Jog the spindle to roughly that position. Jog the X axis until it matches the origin. Zero the X-axis workpiece coordinate. Jog the Y axis until it matches the origin. Zero the X-axis workpiece coordinate.
- Choose a location on the workpiece for the Z origin of the workpiece coordinate system. Jog the Z axis until the bit just touches the workpiece surface. Zero the Z-axis workpiece coordinate. (Alternatively, put a piece of paper on the workpiece surface, jog the Z axis down until the bit drags on the paper, then type in 0.004” (0.10mm) for the Z-axis workpiece coordinate.)
Run Test Cut
- Jog Z to raise the spindle up to 1.000” Z on DRO (or more if needed to clear workpiece). Record the Z-axis workpiece coordinate shown in DRO. In Mach4, zero the Z-axis workpiece coordinate.
- In Mach4, press “Cycle Start” button. Be prepared to press “Feed Hold” button or “Stop” button. Watch toolpath on workpiece for unexpected motion or for hitting clamps, etc.
- When done running test cuts, jog Z to lower the spindle to -1.000” Z on DRO (or, if other value was recorded, to the negative of that value). In Mach 4, zero the Z-axis workpiece coordinate.
Put on PPE
- Put on safety glasses and hearing protection or other appropriate PPE (personal protection equipment).
Turn on Dust Collection
- Turn crank (on top of filter) a few times. Check collection bag & replace if full. Turn on dust collection motor using switch on back (by the wall).
- Jog Z to raise spindle about 1” (25mm). Put dust shoe onto spindle head (only when spindle motor is off).
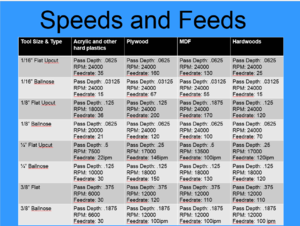
Turn on Spindle
- Check that bit is in securely & that bit is clear.
- Turn on the spindle motor (toggle switch on right of control box). Adjust spindle speed with dial (middle of box) and check speed on display (center of box). (Typical value is 20k RPM.)
Run the Cut
- Verify that speed overrides & other settings are correct for cutting. Stop, think, & verify that you are ready to cut.
- In Mach4, press “Cycle Start” button. Be prepared to press “Feed Hold” button or “Stop” button. Watch toolpath on the workpiece for unexpected motion or for hitting clamps, etc.
- Adjust spindle motor speed as needed.
References & Experts
References
- Darkmoonsinger's excellent writeup (but somewhat dated now).
- Additional notes in this forum thread.
- "CNC 101" class presentation. NPolansky created in Jul 2016. Covers 4x4 CNC Mill, Haas VF-1 CNC Mill, Vcarve software, Fusion 360 software, CNC operation, etc.
Experts
- CNC Experts: npolanosky; chorca; circuit.
- G-code Experts: netadmindave.
Internal Links
- 4x4 CNC Router Upgrades.
- Router (general).
- Router/Router Table.
- Vcarve software.
- Mach4 software.
- CNC (general).
External Links
- CNC Basics for Routers, Part 1 by This Old Tony on YouTube.
- CNC Basics for Routers, Part 2 by This Old Tony on YouTube.
